Leveraging Schema Markup for Effective Semantic SEO.

How to choose structured data to your website?
Adding schema markup to your site can help improve your visibility in search results and increase click-through rates.
Here are some steps to guide you through the process:
Understand the purpose of your site. First and foremost, clearly define the purpose of your site. Is it an online store, a blog, an informational site, or something else? Determining your purpose will help you identify the relevant tags that are most meaningful to your site.
Analyze your website content. Review the content of your website and identify the main topics and categories. For example, if you have an online store, you may have product categories such as clothing, electronics, furniture.
Explore user intent. Consider what information users may be seeking when they come to your website. What questions might they have? For example, if you have a culinary blog, users may be looking for recipes, cooking times, ingredient information, etc.
Adding schema tags. After selecting the appropriate schema tags, you can add them to the HTML code of your webpage. Schema tags should be placed in relevant locations on the page, such as headings, product descriptions, addresses, ratings, etc. You can manually add these tags to the HTML code or use plugins or tools that automatically generate schema tags based on the entered information.
There are many online tools available, such as Schema.org or Google Developer tools, that can help in choosing the appropriate schema tags. These tools offer a rich library of available tags that can be applied depending on the type of content on your website.
Examples of using schema.
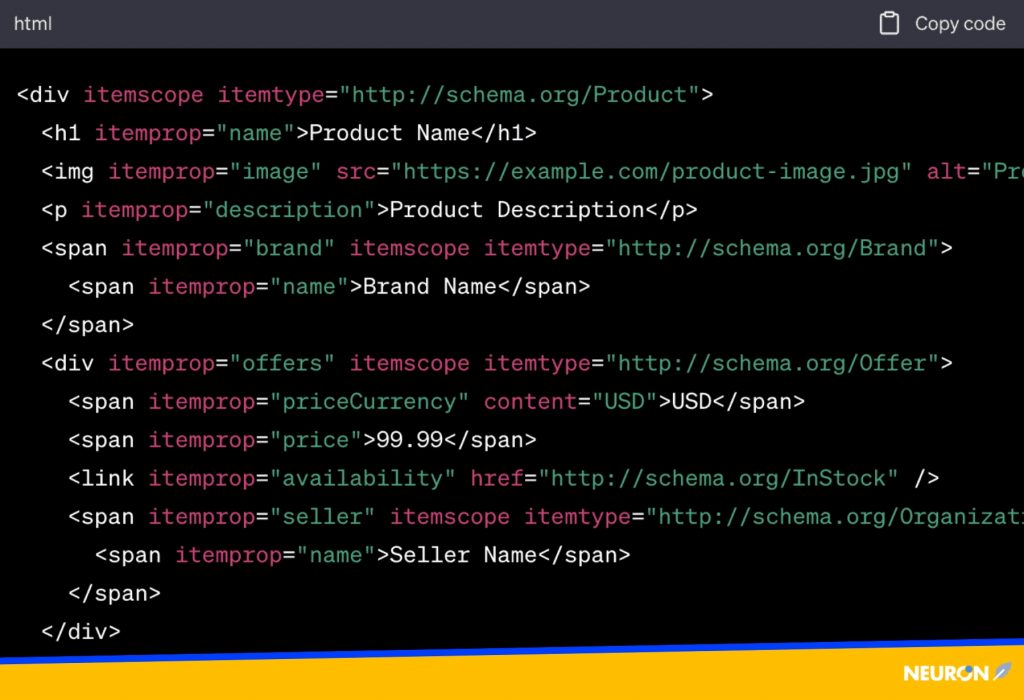
Product markup. If your website is an online store, you can use this markup for each product you offer. You can include information such as the product name, price, description, availability, and customer ratings.

In this example, the product tag is represented using the HTML5 itemprop attribute and the corresponding schema.org properties. Here’s a brief explanation of each property:
itemprop=”name”: Specifies the name of the product.
itemprop=”image”: Specifies the URL of the product image.
itemprop=”description”: Provides a description of the product.
itemprop=”brand”: Specifies the brand of the product.
itemprop=”offers”: Represents the offer for the product.
itemprop=”priceCurrency”: Specifies the currency of the price.
itemprop=”price”: Specifies the price of the product.
itemprop=”availability”: Specifies the availability of the product.
itemprop=”seller”: Represents the seller or organization offering the product.
It’s important to note that the example above uses HTML syntax for representing the schema.org properties. However, the actual implementation may vary depending on the webpage structure and the specific requirements of the schema.org markup.
BlogPosting markup. If your website is a blog, you can use this markup for each blog article. You can include information such as the article title, author, publication date, and a brief description.
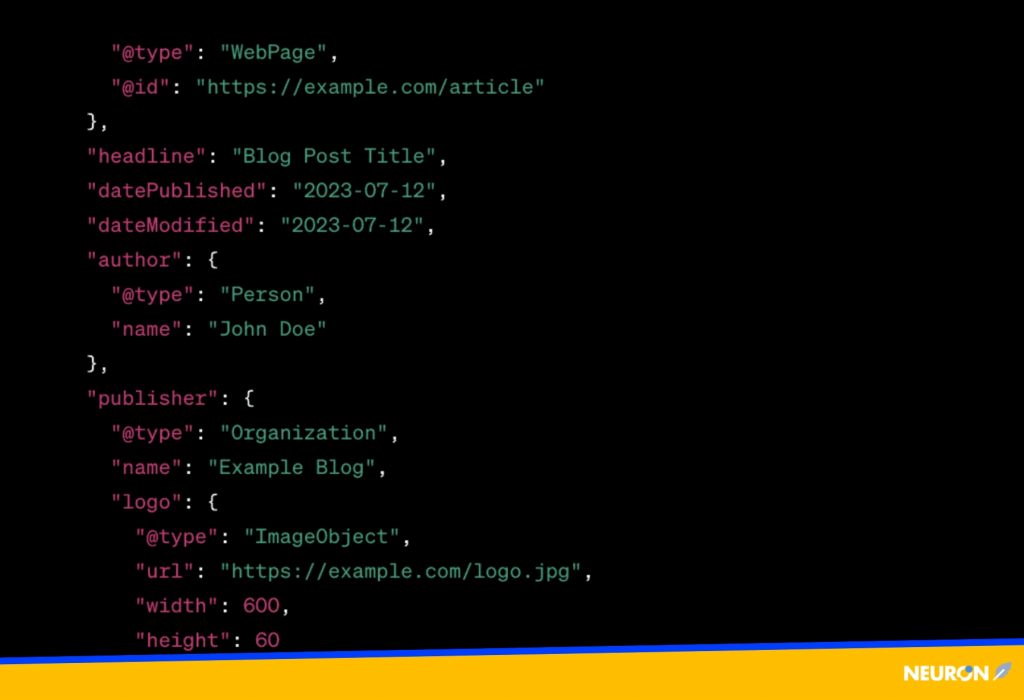
Example of a BlogPosting markup in JSON-LD format:

- “@type”: “BlogPosting” specifies that it’s a blog post.
- “mainEntityOfPage” indicates that the blog post is the main entity of a web page and provides the URL of the article.
- “headline” represents the title of the blog post.
- “datePublished” indicates the date the blog post was published.
- “dateModified” represents the date when the blog post was last modified.
- “author” specifies the author of the blog post, using the “Person” type.
- “publisher” represents the organization or blog that published the blog post, using the “Organization” type. It includes the name of the publisher and the logo of the blog.
- “description” provides a brief summary or description of the content of the blog post.
I encourage you to check out the Schema.org documentation and tools available on sites like Google Developers that offer detailed instructions and support in implementing markup.

